

Generate an index
Once you’ve added index entries and previewed them in the Index panel, you’re ready to generate an index story to place in your document for publication.
An index story can appear as a separate document or in an existing document. When you generate an index story, InDesign compiles index entries and updates page numbers across your document or book. If you add or delete index entries or update numbering in your document, however, you’ll need to regenerate the index to update it.
If an index marker appears in overset text when you generate the index, you are asked if you would like to include these markers in the index. If you click Yes, the entry appears in the index without a page number.
For a video on creating an index, see www.adobe.com/go/vid0220.
- Do one of the following:
-
If you’re creating an index for a single document, you may want to add a new page at the end of the document.
-
If you’re creating an index for multiple documents in a book, create or open the document to be used for the index, and make sure that it’s included in the book.
-
- Choose Generate Index in the Index panel menu. Specify
settings for the following options:
-
For Title, type the text that will appear at the top of the index. To determine how the title is formatted, select a style in the Title Style pop‑up menu.
-
Select Replace Existing Index to update an existing index. This option is dimmed if you haven’t generated an index.
-
Select Include Book Documents to create a single index for all documents in the current book list and to renumber the book’s pages. Deselect this option if you want to generate an index for the current document only.
-
Select Include Entries On Hidden Layers if you want index markers on hidden layers to be included in your index.
-
To view additional index options, click More Options.
-
- Click OK. If Replace Existing Index is deselected, a loaded text icon appears. Place the index story as you would any other text.
 If you edit entries in the index story,
these changes are overridden when you regenerate the index. For
best results, edit the index in the Index panel, and then generate
the index again.
If you edit entries in the index story,
these changes are overridden when you regenerate the index. For
best results, edit the index in the Index panel, and then generate
the index again.  Index formatting options
When you click More Options in the Generate Index dialog box, formatting options appear that let you determine the style and appearance of the generated index. InDesign includes a number of built‑in paragraph and character styles that you can select to format the generated index, or you can create and select your own styles. After you generate the index, you can edit these styles in the Paragraph Styles and Character Styles panels.
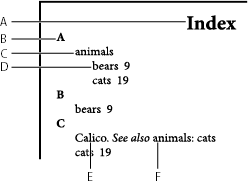
- A.
- Title
- B.
- Section heading
- C.
- Level 1 entry
- D.
- Level 2 subentry
- E.
- Topic
- F.
- Cross‑reference
To replace the entry separators (such as the values
for Following Topic or Between Entries), select the existing separator
and then type or choose a replacement character.- Nested or Run-in
- Select Nested if you want the index formatted in the default style, with subentries nested under an entry as separate indented paragraphs. Select Run-in if you want all levels of an entry to appear in a single paragraph. The Between Entries option determines which character separates the entries.
- Include Index Section Headings
- Select this option to generate section headings consisting of alphabet characters (A, B, C, and so on) representing the section that follows.
- Include Empty Index Sections
- Select this option to generate section headings for all letters of the alphabet, even if the index lacks any first-level entries that begin with a particular letter.
- Level Style
- For each index level, choose a paragraph style to be applied to each level of index entries. You can edit these styles in the Paragraph Styles panel after you generate the index.
- Section Heading
- Select the paragraph style that determines the appearance of the section headings (A, B, C, and so on) in the generated index.
- Page Number
-
Select the character style that determines the appearance
of the page numbers in the generated index. This setting does not
affect index entries you formatted using the Number Style Override
option.
Note: If you want the page numbers in the index to include prefixes, as in B‑1 or II‑1, see Define section numbering.
- Cross-reference
- Select the character style that determines the appearance of cross‑reference prefixes (such as See and See also) in the generated index.
- Cross-referenced Topic
- Select the character style that determines the appearance of the topic being referred to (such as beasts in See also beasts) in the generated index.
- Following Topic
- Type or select a special character to separate the entry from the page number (such as Animals 38). The default is two spaces. Determine formatting for this character by editing the corresponding Level Style, or by selecting another.
- Between Page Numbers
- Type or select a special character to separate one page number or range from another. The default is a comma followed by an en space.
- Between Entries
- If Run-in is selected, type or select a special character to determine how entries and subentries are separated. If Nested is selected, this setting determines how two cross-references under a single entry are to be separated.
- Before Cross-reference
- Type or select a special character that appears between a reference and a cross-reference, as in Animals. See also beasts. The default is a period followed by a space. Determine formatting for this character by switching or editing the corresponding level style.
- Page Range
- Type or select a special character to separate the first and last numbers in a page range (such as Animals 38–43). The default is an en dash. Determine formatting for this character by switching or editing the Page Number style.
- Entry End
- Type or select a special character to appear at the end of entries. If Run-in is selected, the specified character appears at the end of the last cross-reference. The default is no character.