

Create an anchored object
If an object isn’t available to place into the document (for example, sidebar text that is not written yet), you can create an empty anchored frame as a placeholder for content you can add later. You can resize the anchored frame at anytime and the position settings for the frame update automatically.
- Do one of the following:
-
To add an anchored object, use the Type tool to position an insertion point where you want the object’s anchor to appear, and then place or paste the object.
 If the frame for the object is taller than the
line of text in which it appears, text might overlap the imported
image or you might see increased space above the line. Consider
selecting a different anchored object position, inserting a soft
or hard line break, resizing the inline object, or specifying a
different leading value for the surrounding lines.
If the frame for the object is taller than the
line of text in which it appears, text might overlap the imported
image or you might see increased space above the line. Consider
selecting a different anchored object position, inserting a soft
or hard line break, resizing the inline object, or specifying a
different leading value for the surrounding lines. -
To anchor an existing object, select it and choose Edit > Cut. Then, using the Type tool, position the insertion point where you want the object to appear, and choose Edit >Paste. By default, the anchored object’s position is inline.
-
To add a placeholder frame for an object that isn’t available (for example, text you have yet to write for a sidebar), use the Type tool to position the insertion point where you want the object’s anchor to appear; then choose Object > Anchored Object > Insert.
You can anchor
text characters by creating outlines of the text. Creating outlines automatically
converts each character of text to an inline anchored object.
-
- To position the object, select it with a selection tool and choose Object > Anchored Object > Options. Specify options as desired.
To bypass the Anchored Object dialog
box, use the Insert Anchored Object/Go To Anchor Marker keyboard
shortcut. You’ll need to designate keys for this shortcut in the
Keyboard Shortcut Editor (it’s listed in the Text and Tables area).
Pressing the shortcut twice deselects the object and positions the
cursor back in the main text. (See Use keyboard shortcut sets.) Inserted Anchored Objects options
When you insert a placeholder for an anchored object, you can specify the following options for the contents:
- Content
-
Specifies the type of object the placeholder frame will contain.
Note: If you choose Text, an insertion point appears in the text frame; if you choose Graphic or Unassigned, InDesign selects the object frame.
- Object Style
- Specifies the style you want to use to format the object. If you have defined and saved object styles, they will appear in this menu.
- Paragraph Style
-
Specifies the paragraph style you want to use to format the object.
If you have defined and saved paragraph styles, they will appear
in this menu.
Note: If the object style has a paragraph style enabled and you choose a different style from the Paragraph Style menu, or if you make changes to the Anchored Position options for a style, a plus sign (+) appears in the Object Style menu indicating that overrides have been made.
- Height and Width
- Specify the dimensions of the placeholder frame.
Inline and Above Line position options
When you choose Inline or Above Line from the Position menu in the Anchored Object Options dialog box, the following options are available for setting the position of the anchored object. (You can also access these options in the Insert Anchored Object dialog box.)
- Inline
- Aligns the bottom of the anchored object to the baseline. Inline objects are subject to certain constraints when moving along the y axis: the top of the object can’t go below the bottom leading slug and the bottom of the object can’t go above the top of the leading slug.
- Y Offset
- Adjusts the position on the baseline. You can also use the mouse to drag the object vertically on the page.
- Above Line
- Aligns the object above the text line containing the anchor marker and below the line of text above the anchor marker.
- Alignment
-
Choose from the following options:
- Left, Right, and Center
- Align the object within the text column. These options ignore indent values applied to the paragraph and align the object within the entire column.
- Towards Spine and Away From Spine
- Align the object left or right depending on the side of the spread the object is on. These options ignore indent values applied to the paragraph and align the object within the entire column.
- (Text Alignment)
- Aligns the object based on the alignment defined by the paragraph. This option uses the paragraph indent values when aligning the object.
- Space Before
- Specifies the position of the object relative to the bottom of the leading slug in the preceding line of text. Positive values lower both the object and the text below it. Negative values move the text below the object up toward the object. The maximum negative value is the height of the object.
- Space After
-
Specifies the position of the object relative to the cap-height
of the first character in the line below the object. A value of
0 aligns the bottom of the object to the cap-height position. Positive
values move the text below the object down (away from the bottom
of the object). Negative values move the text below the object up
(toward the object).
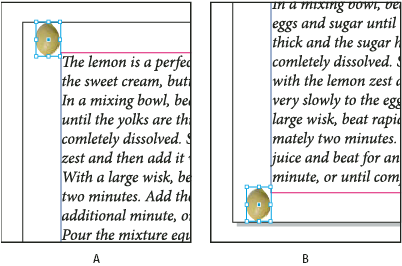
 Using the Space Before and Space After options
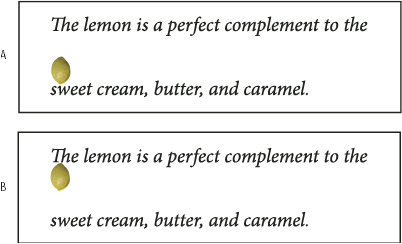
- A.
- A Space Before value of 0P10 moves the object and it’s associated text further away from the text line above it.
- B.
- A Space After value of 0p10 moves the object and the text line above it further away from its associated text line (below).
Custom position options
You can use the following options when positioning a custom-positioned anchored object. You can specify these options in the Insert Anchored Object dialog box or the Anchored Object Options dialog box. For step‑by‑step instructions for using these options, see Position a custom-positioned anchored object.
- Relative To Spine
-
Specifies whether the object aligns relative to the document spine.
When you select this option, the Anchored Object Reference Point
proxy displays as a two page spread. The two pages mirror each other.
When selected, objects positioned on one side of a spread, for instance
the outside margin, remain on the outside margin even when the text
reflows to a facing page.
View full size graphic
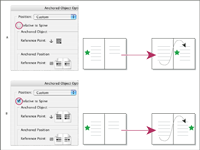 Using the Relative To Spine option
- A.
- Relative To Spine not selected: the object remains on the left side of the text frame when text reflows across to the right side of the spread.
- B.
- Relative To Spine selected: the object remains on the outside edge of the page when the text reflows to the right side of the spread.
Note: If, after you select Relative To Spine you adjust the X Offset value, the direction the object moves may change. This change occurs because the direction of movement depends partly on the side of the spread the object is on. - Anchored Object Reference Point

- Specifies the location on the object that you want to align to the location on the page (as specified by the Anchored Position Reference Point). For example, if you want to align the right side of the object with a page item, such as a text frame, click a rightmost point on this proxy. For more information on using this reference point, see Position a custom-positioned anchored object.
- Anchored Position Reference Point

-
Specifies the location on the page (as defined by the X and
Y Relative To options), to which you want to align the object. For
example, if you choose Text Frame for X Relative To and Line (Baseline)
for Y Relative To, this proxy represents the horizontal area of
the text frame and the vertical area of the text line containing
the object’s anchor marker. If you click the leftmost point on this
proxy, the object’s reference point
 will
align with the left edge of the text frame and the baseline of the
text.
will
align with the left edge of the text frame and the baseline of the
text.
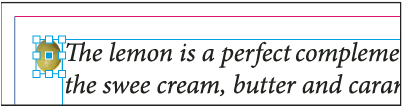 Right side of object aligned with left side of text frame
Note: Depending on what you choose for X Relative To and Y Relative To, the Anchored Position Reference Point proxy displays either three or nine positions. Line options, such as Line (Baseline) provide only three options—middle left, center, and middle right—because the vertical positioning is established by the anchor marker in the text. - X Relative To
-
Specifies what you want to use as the basis for horizontal alignment.
For instance, Text Frame lets you align the object to the left,
center, or right side of the text frame. Where exactly it aligns
horizontally depends on the reference points you choose and any
offset you specify for X Offset.
For example, if you want the object to appear in the page margin with its right edge flush with the page margin, choose Page Margin for X Relative To and specify a rightmost point on the Anchored Object Reference Point proxy and a leftmost point for the Anchored Position Reference Point proxy.
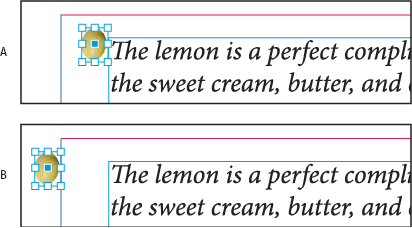 The X Relative To option
- A.
- Aligning the right side of the object to the left side of the text frame
- B.
- Aligning the right side of the object to the left side of the page margin
- X Offset
- Moves the object left or right. Whether it moves to the left or right depends on the reference point. If aligning to the center of the page item, positive values move the object to the right. The direction of movement also depends on whether you’ve selected Relative To Spine.
- Y Relative To
-
Specifies what the object aligns with vertically. For example,
Page Edge lets you use the edge of the page as the basis for aligning
the object to the top, center, or bottom of the page. The Anchored
Position Reference Point specifies if the object aligns to the top,
center, or bottom of this page item. If you choose a line option,
such as Line (Baseline), the Anchored Position Reference Point displays
only the middle horizontal row of points.
 The Y Relative To option
- A.
- Aligning the top of the object to the top page edge
- B.
- Aligning the bottom of the object to the bottom the page edge
- Y Offset
- Moves the object up or down. Positive values move the object downward.
- Keep Within Top/Bottom Column Boundaries
-
Keeps the object inside the text column if reflowing text
would otherwise cause it to move outside of the boundaries. In such
instances, the bottom of the object will align to the bottom inset,
or the top of the object will align to the top inset. For example,
an anchored object off to the side of a line of text and in the
middle of a column looks fine; however, without this option selected,
if the anchored marker flows to the bottom of the column, the object
may drop below the column edge or partially off the page. When this
option is selected, you can’t drag the object above or below the
column boundaries. If you resize the object, it will move back into alignment
with the top or bottom boundaries of the column, if necessary. This option
is only available when you select a line option, such as Line (Baseline)
for Y Relative To.
Note: When InDesign overrides the object’s position to fall within the bounds of the column, the Y offset value you specify appears in the dialog box with a plus sign (+).
- Prevent Manual Positioning
- Ensures that you can’t move the anchored object by dragging or nudging it on the page.
- Preview
- Displays the position adjustments on the page as you make them.