


Use drop caps
You can add drop caps to one or more paragraphs at a time. The drop cap’s baseline sits one or more lines below the baseline of the first line of a paragraph.
You can also create a character style that can be applied to the drop‑cap characters. For example, you can create a tall cap (also called a raised cap) by specifying a 1‑line, 1‑character drop cap and applying a character style that increases the size of the first letter.
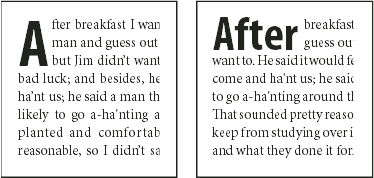
One-character, three-line drop cap (left), and five-character,
two-line drop cap (right)
 Create a drop cap
-
With
the Type tool
 selected,
click in the paragraph where you want the drop cap to appear.
selected,
click in the paragraph where you want the drop cap to appear. - In the Paragraph panel or Control panel, type a number
for Drop Cap Number Of Lines
 to
indicate the number of lines you want the drop cap to occupy.
to
indicate the number of lines you want the drop cap to occupy. - For Drop Cap One Or More Characters
 , type
the number of drop cap characters you want.
, type
the number of drop cap characters you want. - To apply a character style to the drop cap character,
choose Drop Caps And Nested Styles from the Paragraph panel menu
or the Control panel menu, and then choose the character style you
created.
 You can also use the Drop Caps And Nested
Styles dialog box to align the drop cap to the text edge, reducing
the amount of space on the left side of the drop cap, and adjust
for drop cap letters with descenders, such as “g” and “y.” If you
want to resize, skew, or change the typeface of the drop cap letter
for added effect, select the letter or letters and make the formatting
changes.
You can also use the Drop Caps And Nested
Styles dialog box to align the drop cap to the text edge, reducing
the amount of space on the left side of the drop cap, and adjust
for drop cap letters with descenders, such as “g” and “y.” If you
want to resize, skew, or change the typeface of the drop cap letter
for added effect, select the letter or letters and make the formatting
changes.