


Change underline or strikethrough options
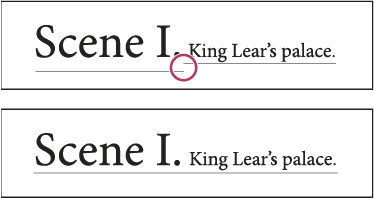
Creating custom underlining is especially useful when you want to create an even underline below characters of different sizes, or for creating special effects, such as background highlighting.
- From the Character panel menu or the Control panel menu, choose Underline Options or Strikethrough Options.
- Do any of the following, and then click OK:
-
Select Underline On or Strikethrough On to turn on underline or strikethrough for the current text.
-
For Weight, choose a weight or type a value to determine the thickness of the underline or strikethrough line.
-
For Type, select one of the underline or strikethrough options.
-
For Offset, determine the vertical position of the line. The offset is measured from the baseline. Negative values move the underline above the baseline and the strikethrough below the baseline.
-
Select Overprint Stroke when you want to make sure that the stroke doesn’t knock out underlying inks on a printing press.
-
Choose a color and tint. If you specified any line type other than solid, choose a gap color or gap tint to change the appearance of the area between dashes, dots, or lines.
-
Select Overprint Stroke or Overprint Gap if the underline or strikethrough will be printed over another color, and you want to avoid errors that can occur with printing misregistration.
-
 To change the underline or strikethrough
options in a paragraph or character style, use the Underline Options
or Strikethrough Options section of the dialog box that appears
when you create or edit the style.
To change the underline or strikethrough
options in a paragraph or character style, use the Underline Options
or Strikethrough Options section of the dialog box that appears
when you create or edit the style.