

Use the Story Editor
You can edit text in InDesign either on the layout page or in the story editor window. Writing and editing in a story editor window allows the entire story to appear in the typeface, size, and spacing that you specify, without layout or formatting distractions.
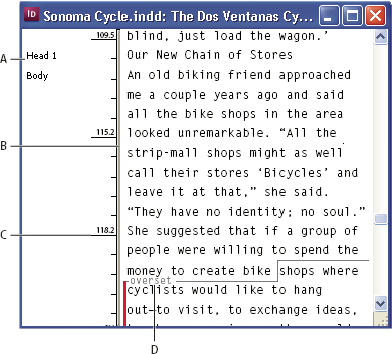
Each story appears in a different story editor window. All the text in the story appears in the story editor, including overset text. You can open several story editor windows simultaneously, including multiple instances of the same story. A vertical depth ruler indicates how much text is filling the frame, and a line indicates where text is overset.
When you edit a story, changes are reflected in the layout window. Open stories are listed in the Window menu. You cannot create a new story in a story editor window.
- A.
- Paragraph styles
- B.
- Drag divider to adjust column width
- C.
- Vertical depth ruler
- D.
- Overset text indicator
 Open the Story Editor
- Select the text frame, click an insertion point in the text frame, or select multiple frames from different stories.
- Choose Edit > Edit In Story Editor.
 To open another instance of the same
story editor window, make the story editor active, and choose Window >
Arrange > New Window.
To open another instance of the same
story editor window, make the story editor active, and choose Window >
Arrange > New Window.Return to the layout window
 In Story Editor, do one of the
following:
In Story Editor, do one of the
following:-
Choose Edit > Edit In Layout. When you use this method, the layout view displays the same text selection or insertion-point location as last appeared in the story editor, and the story window remains open but moves behind the layout window.
-
Click in the layout window. The story window remains open but moves behind the layout window.
-
Close the story editor window.
-
Choose the document name from the bottom of the Window menu.
Show or hide Story Editor items
You can show or hide the style name column and the depth ruler, and you can expand or collapse footnotes. These settings affect all open story editor windows, as well as all subsequently opened windows.
- With the story editor active, choose View > Story Editor > Show Style Name Column or Hide Style Name Column. You can also adjust the width of the style name column by dragging the vertical bar. Subsequent story editor windows have the same column width.
- With the Story Editor active, choose View > Story Editor > Show Depth Ruler or Hide Depth Ruler.
- With the Story Editor Active, choose View > Story Editor > Expand All Footnotes or Collapse All Footnotes.
Story Editor preferences
|
Attribute |
Icon |
|---|---|
|
Table |
|
|
Inline objects |
|
|
XML tags |
|
|
Variables |
|
|
Hyperlink sources |
|
|
Hyperlink anchors |
|
|
Footnotes |
|
|
Index markers |
|
|
Ruby |
|
|
Warichu |
|
|
Tate-Chu-Yoko |
|
|
Kenten |
|


- Text Display Options
- Choose a display font, size, line spacing, text color, and background. You can also specify a different theme, such as selecting Classic System to view yellow text on a black background. These settings affect the display of text in the story editor window, not how they appear in layout view.
- Enable Anti-Aliasing
- Smooth the jagged edges of type, and choose the Type of anti-aliasing: LCD Optimized, Soft, or the Default setting, which uses shades of gray to smooth text. LCD Optimized uses colors, rather than shades of gray, to smooth text, and works best on light-colored backgrounds with black text. Soft uses shades of gray, but produces a lighter, fuzzier appearance than Default.
- Cursor Options
- Change the appearance of the text cursor. For example, select Blink if you want the cursor to blink.
Text from inline frames does not appear in the parent story editor window, but it can appear in its own story editor window. Table text does not appear in story editor windows.