


Alternate strokes and fills in a table
You can alternate strokes and fills to enhance readability or improve the appearance of your table. Adding alternate strokes and fills to table rows does not affect the appearance of the table’s header and footer rows. However, adding alternate strokes and fills to columns does affect header and footer rows.
Alternating stroke and fill settings override cell stroke formatting, unless you select the Preserve Local Formatting option in the Table Options dialog box.
 If you want to apply a fill or stroke
to every body cell in the table, and not just alternating patterns,
you can still use the alternating stroke and fill settings to create such
non-alternating patterns. To create such an effect, specify 0 for
Next in the second pattern.
If you want to apply a fill or stroke
to every body cell in the table, and not just alternating patterns,
you can still use the alternating stroke and fill settings to create such
non-alternating patterns. To create such an effect, specify 0 for
Next in the second pattern.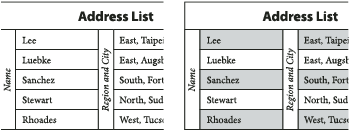
Before (left) and after (right) alternating fills in a table
 Add alternating strokes to a table
Add alternating fills to a table
- With the insertion point in the table, choose Table > Table Options > Alternating Fills.
- For Alternating Pattern, select the type of pattern you want to use. Select Custom if you want to specify a pattern, such as one row shaded in gray followed by three rows shaded in yellow.
- Under Alternating, specify the stroke or fill options for both the first pattern and the subsequent pattern. For example, if you selected Every Second Column for Alternating Pattern, you may want to shade the first two columns in a gray tint and leave the next two columns blank. Specify 0 for Next if you want the fill to apply to every row.
- Select Preserve Local Formatting if you want previously formatted fills applied to the table to remain in effect.
- For Skip First and Skip Last, specify the number of rows or columns at the beginning and end of the table in which you do not want fill attributes to appear, and then click OK.