


Add table headers and footers
When you create a long table, the table may span more than one column, frame, or page. You can use headers or footers to repeat the information at the top or bottom of each divided portion of the table.
You can add header and footer rows when you create the table. You can also use the Table Options dialog box to add header and footer rows and change how they appear in the table. You can convert body rows to header or footer rows.
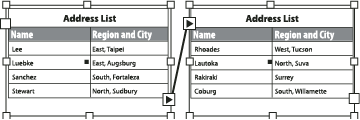
Header rows repeated once per frame
 To number tables sequentially, such as Table 1A,
Table 1B, and so on, add a variable to the table header or footer.
(See Create running captions for figures and tables.)
To number tables sequentially, such as Table 1A,
Table 1B, and so on, add a variable to the table header or footer.
(See Create running captions for figures and tables.)For a video on creating table headers and footers, see www.adobe.com/go/vid0082.
 Convert existing rows to header or footer rows
- Select the rows at the top of the table to create header rows, or at the bottom of the table to create footer rows.
- Choose Table > Convert Rows > To Header or To Footer.
Change header or footer row options
- Place the insertion point in the table, and then choose Table > Table Options > Headers And Footers.
- Specify the number of header or footer rows. Blank rows may be added to the top or bottom of the table.
- Specify whether the information in the header or footer appears in every text column (if text frames have more than one column), once per frame, or only once per page.
- Select Skip First if you don’t want the header information to appear in the first row of the table. Select Skip Last if you don’t want the footer information to appear in the last row of the table.
- Click OK.
 Do any of the following: