

Specify printer’s marks
When you prepare a document for printing, a number of marks are needed to help the printer determine where to trim the paper, align separation films when producing proofs, measure film for correct calibration and dot density, and so on. Selecting any page-mark option expands the page boundaries to accommodate printer’s marks, bleed (the parts of text or objects that extend past the page boundary to account for slight inaccuracy when trimming), or slug area (an area outside the page and bleed that contains printer instructions or job sign-off information).
If you are setting crop marks and want the artwork to contain a bleed or slug area, make sure that you extend the artwork past the crop marks to accommodate the bleed or slug. Also make sure that your media size is large enough to contain the page and any printer’s marks, bleeds, or the slug area. If a document doesn’t fit the media, you can control where items are clipped by using the Page Position option in the Setup area of the Print dialog box.
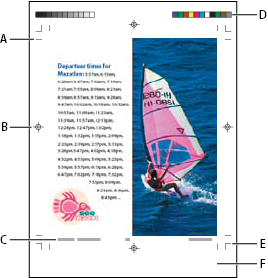
- A.
- Crop marks
- B.
- Registration mark
- C.
- Page information
- D.
- Color bars
- E.
- Bleed marks
- F.
- Slug area
- Choose File > Print.
- Click Marks and Bleed on the left side of the Print dialog box.
- Select either All Printer’s Marks or individual marks.