

Apply master pages
If your document contains custom spreads (such as a 3- or 4‑page foldout in a magazine), any master you apply should contain the same number of pages.
Note: Master
items on a document page have a dotted border. If you cannot view master
items on a document page, the master item may be hidden on a lower
layer or the master items may be hidden. Choose Show Master Items
from the Pages panel menu.
 Apply a master to a document page or spread
- To apply a master to a spread, drag the master page icon
to a corner of the spread in the Pages panel. When a black rectangle
surrounds all pages in the desired spread, release the mouse button.
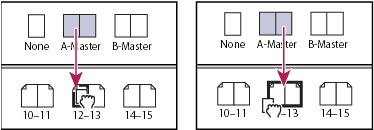 Applying a master to a page (left) and applying a master to a spread (right)
Apply a master to multiple pages
 Do one of the following:
-
In the Pages panel, select the pages to which you want to apply a new master. Then press Alt (Windows) or Option (Mac OS) as you click a master.
-
Choose Apply Master To Pages from the Pages panel menu, select a master for Apply Master, make sure that the page ranges in the To Pages option are the ones you want, and click OK. You can apply a master to multiple pages at once. For example, you can type 5, 7‑9, 13‑16 to apply the same master to pages 5, 7‑9, and 13‑16. (See Display absolute or section numbering in the Pages panel.)
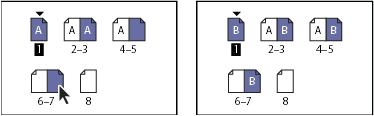
Applying a master to a discontiguous range of pages