Photoshop

TOPIC APPEARS IN:

Compensate for chromatic aberration in Camera Raw

Chromatic aberration is a common defect caused by the failure of the lens to focus different frequencies (colors) to the same spot. In one type of chromatic aberration, the image from each color of light is in focus, but each image is a slightly different size. This type of aberration is seen as a complementary color fringing in areas away from the center of the image. For example, you may see a red fringe on the side of an object toward the center of the image, and cyan fringe on the side of the object away from the center of the image.

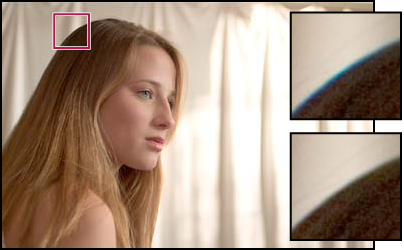
Original image (top), and after fixing chromatic aberration (bottom)

  1. Zoom into an area near the corner of the preview image. For the best results, the area should contain very dark or black detail against a very light or white background. Look for the color fringing.
  2. In the Lens Corrections tab, adjust any of these controls:
    Fix Red/Cyan Fringe
    Adjusts the size of the red channel relative to the green channel. This compensates for red/cyan color fringing.

    Fix Blue/Yellow Fringe
    Adjusts the size of the blue channel relative to the green channel. This compensates for blue/yellow color fringing.

    Look at the preview image as you move the slider left or right. If you’re adjusting red/cyan color fringing, hold down Alt (Windows) or Option (Mac OS) to hide the blue/yellow color fringing. Similarly, hold down Alt (Windows) or Option (Mac OS) while adjusting the blue/yellow color fringing to hide the red/cyan color fringing. The goal is to reduce the color fringing as much as possible.