


Camera Raw dialog box overview
View full size graphic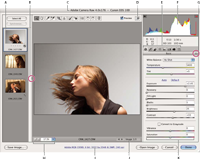
Camera Raw dialog box
- A.
- Filmstrip
- B.
- Toggle Filmstrip
- C.
- Camera, file name, and Exif information
- D.
- Toggle full screen mode
- E.
- Image adjustment tabs
- F.
- Histogram
- G.
- Camera Raw Settings menu
- H.
- Zoom levels
- I.
- Click to display workflow options
- J.
- Navigation arrows
- K.
- Adjustment sliders
Note: Some controls that are available when you open the Camera
Raw dialog box from Bridge or Photoshop are not available when you
open the Camera Raw dialog box from After Effects.
 Camera Raw Settings menu
To open the Camera Raw Settings menu,
click the button  in
the upper-right corner of any of the image adjustment tabs. Several
of the commands in this menu are also available from the Edit >
Develop Settings menu in Bridge.
in
the upper-right corner of any of the image adjustment tabs. Several
of the commands in this menu are also available from the Edit >
Develop Settings menu in Bridge.
Camera Raw view controls
- Zoom tool

- Sets the preview zoom to the next higher preset value when you click the preview image. Alt‑click (Windows) or Option-click (Mac OS) to use the next lower zoom value. Drag the Zoom tool in the preview image to zoom in on a selected area. To return to 100%, double-click the Zoom tool.
- Hand tool
- Moves the image in the preview window if the preview image is set at a zoom level higher than 100%. Hold down the spacebar to temporarily activate the Hand tool while using another tool. Double-click the Hand tool to fit the preview image to the window.
- Select Zoom Level
- Choose a magnification setting from the menu or click the Select Zoom Level buttons.
- Preview
- Displays a preview of the image adjustments made in the current tab, combined with the settings in the other tabs. Deselect to show the image with the original settings of the current tab combined with the settings in the other tabs.
- RGB
- Shows the red, green, and blue values of the pixel under the pointer in the preview image.
- Shadows and Highlights
- Displays shadow and highlight clipping. Clipped shadows appear in blue, and clipped highlights appear in red. Highlight clipping is shown if any one of the three RGB channels is clipped (fully saturated with no detail). Shadow clipping is shown if all three RGB channels are clipped (black with no detail).
Image adjustment tabs
- Basic
- Adjust white balance, color saturation, and tonality.
- Tone Curve
- Fine‑tune tonality using a Parametric curve and a Point curve.
- Detail
- Sharpen images or reduce noise.
- HSL / Grayscale
- Fine‑tune colors using Hue, Saturation, and Luminance adjustments.
- Split Toning
- Color monochrome images or create special effects with color images.
- Lens Corrections
- Compensate for chromatic aberration and vignetting caused by the camera lens.
- Camera Calibration
- Correct a color cast in the shadows and adjust non-neutral colors to compensate for the difference between the behavior of your camera and the Camera Raw profile for your camera model.
- Presets
- Save and apply sets of image adjustment settings as presets.