Photoshop

Paste an item into Vanishing Point

You can paste an item from the clipboard in Vanishing Point. The copied item can be from the same document or a different one. Once pasted into Vanishing Point, the item becomes a floating selection that you can scale, rotate, move or clone. When the floating selection moves into a selected plane, it conforms to the plane’s perspective.

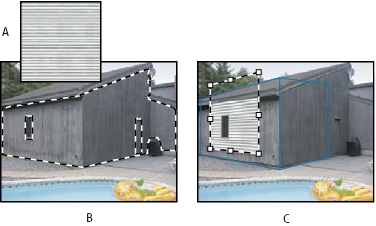
Pasting an item into Vanishing Point

A.
Copied pattern from a separate document

B.
Image with selection (to confine results) created in Photoshop before opening Vanishing Point

C.
Pasted pattern in Vanishing Point is moved into the plane and honors the selection

For convenience, it’s recommended that you create perspective planes in a previous Vanishing Point session.
  1. Copy an item to the clipboard. The copied item can be from the same or different document. Keep in mind that you can paste only a raster (not vector) item.
    Note: If you’re copying type, select the entire text layer and then copy to the clipboard. You’ll be pasting a rasterized version of the type into Vanishing Point.
  2. (Optional) Create a new layer.
  3. Choose Filter > Vanishing Point.
  4. If necessary, create one or more planes in the image.
  5. Press Ctrl‑V (Windows) or Command‑V (Mac OS) to paste the item.

    The pasted item is now a floating selection in the upper left corner of the preview image. By default, the Marquee tool is selected.

  6. Use the Marquee tool to drag the pasted image to a plane.

    The image conforms to the perspective of the plane.

    Important: After pasting the image in Vanishing Point, do not click anywhere in the image with the Marquee tool except to drag the pasted image to a perspective plane. Clicking anywhere else deselects the floating selection and permanently pastes the pixels into the image.