

Create adjustment and fill layers
Adjustment layers and
fill layers have the same opacity and blending mode options as image
layers. You can rearrange, delete, hide, and duplicate them just as
you do image layers. By default, adjustment layers and fill layers
have layer masks, as indicated by the mask icon to the left of the
layer thumbnail. To create adjustment layers without layer masks,
change this option in the Layer Palette Options dialog (choose Palette
Options from the Layers palette menu).
 To confine
the effects of the adjustment layer or fill layer to a selected
area, make a selection, create a closed path and select it, or select
an existing closed path. When you use a selection, you create an adjustment
layer or fill layer confined by a layer mask. When you
use a path, you create an adjustment layer or fill layer confined by
a vector mask.
To confine
the effects of the adjustment layer or fill layer to a selected
area, make a selection, create a closed path and select it, or select
an existing closed path. When you use a selection, you create an adjustment
layer or fill layer confined by a layer mask. When you
use a path, you create an adjustment layer or fill layer confined by
a vector mask.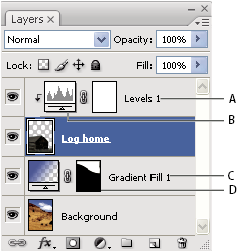
Adjustment and fill layers
- A.
- Adjustment layer confined to Log Home layer only
- B.
- Layer thumbnail
- C.
- Fill layer
- D.
- Layer mask
 Create an adjustment layer
For information on specific adjustment layer options, see Making color and tonal adjustments.
 Do
one of the following:
Do
one of the following:-
Click the New Adjustment Layer button
 at the
bottom of the Layers palette, and choose an adjustment layer type.
at the
bottom of the Layers palette, and choose an adjustment layer type. -
Choose Layer > New Adjustment Layer, and choose an option. Name the layer, set layer options, and click OK.
To confine the effects of an adjustment
layer to a group of layers, create a clipping mask consisting of
those layers. You can place the adjustment layers in or at the base
of the clipping mask. The resulting adjustment is confined to the
layers inside the group. (Alternatively, you can create a layer
group that uses any blending mode other than Pass Through.)Create a fill layer
Do
one of the following:-
Choose Layer > New Fill Layer, and choose an option. Name the layer, set layer options, and click OK.
-
Click the New Adjustment Layer button at the
bottom of the Layers palette, and choose a fill layer type.
- Solid Color
- Fills the adjustment layer with the current foreground color. Use the Color Picker to select a different a fill color.
- Gradient
- Click the gradient to display the Gradient Editor, or click the inverted arrow and choose a gradient from the pop‑up palette. Set additional options if desired. Style specifies the shape of the gradient. Angle specifies the angle at which the gradient is applied. Scale changes the size of the gradient. Reverse flips the orientation of the gradient. Dither reduces banding by applying dithering to the gradient. Align With Layer uses the bounding box of the layer to calculate the gradient fill. You can drag in the image window to move the center of the gradient.
- Pattern
- Click the pattern, and choose a pattern from the pop‑up palette. Click Scale, and enter a value or drag the slider. Click Snap To Origin to make the origin of the pattern the same as the origin of the document. Select Link With Layer if you want the pattern to move along with the layer as the layer moves. When Link With Layer is selected, you can drag in the image to position the pattern while the Pattern Fill dialog box is open.