

About the HDR Color Picker (Photoshop Extended)
The HDR Color Picker allows you to accurately view and select colors for use in 32‑bit HDR images. As in the regular Adobe Color Picker, you select a color by clicking a color field and adjusting the color slider. The Intensity slider allows you to adjust the brightness of a color to match the intensity of the colors in the HDR image you’re working with. A Preview area lets you view swatches of a selected color to see how it will display at different exposures and intensities.
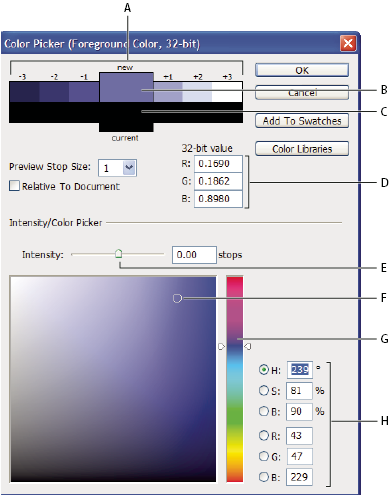
- A.
- Preview area
- B.
- Adjusted color
- C.
- Original color
- D.
- 32‑bit floating point values
- E.
- Intensity slider
- F.
- Picked color
- G.
- Color slider
- H.
- Color values
 Display the HDR Color Picker
 With a 32‑bpc image open, do one
of the following:
With a 32‑bpc image open, do one
of the following:-
In the toolbox, click the foreground or background color selection box.
-
In the Color palette, click the Set Foreground Color or Set Background Color selection box.
The color picker is also available when features let you choose a color. For example, by clicking the color swatch in the options bar for some tools, or the eyedroppers in some color adjustment dialog boxes.
Choose Colors for HDR images
The lower part of the HDR Color Picker functions like the regular color picker does with 8‑ or 24‑bit images. Click in the color field to select a color and move the color slider to change hues, or use the HSB or RGB fields to enter numeric values for a particular color. In the color field, brightness increases as you move from bottom to top, and saturation increases as you move from left to right.
Use the Intensity slider to adjust the brightness of the color. The color value plus the intensity value are converted to 32‑bit floating point number values in your HDR document.