


White balance controls in Camera Raw
In very simple terms, adjusting the white balance is a matter of identifying what objects in the image should be neutral-colored (white or gray) and then adjusting the colors in the image to make those objects neutral-colored. A white or gray object in a scene takes on the color cast by the ambient light or flash used to shoot the picture. When you use the White Balance tool to specify an object that should be white or gray, Camera Raw can determine the color of the light in which the scene was shot and then adjust for scene lighting automatically.
Color temperature (in Kelvins) is used as a measure of scene lighting because natural and incandescent light sources give off light in a predictable distribution according to their temperature.
The Basic tab in the Camera Raw dialog box has three controls for correcting a color cast in an image:
- White Balance
-
Camera Raw applies the white balance setting and changes
the Temperature and Tint properties in the Basic tab accordingly.
Use these controls to fine-tune the color balance.
- As Shot
- Uses the camera’s white balance settings, if they are available.
- Auto
- Calculates the white balance based on the image data.
Note: If Camera Raw doesn’t recognize the white balance setting of a camera, choosing As Shot is the same as choosing Auto. - Temperature
-
Sets the white balance to a custom color temperature. Decrease Temperature
to correct a photo taken with a lower color temperature of light;
the Camera Raw plug‑in makes the image colors bluer to compensate
for the lower color temperature (yellowish) of the ambient light.
Conversely, increase Temperature to correct a photo taken with a
higher color temperature of light; the image colors become warmer
(yellowish) to compensate for the higher color temperature (bluish)
of the ambient light.
Note: The range and units for the Temperature and Tint controls are different when you are adjusting a non-camera raw image, such as a TIFF or JPEG image.
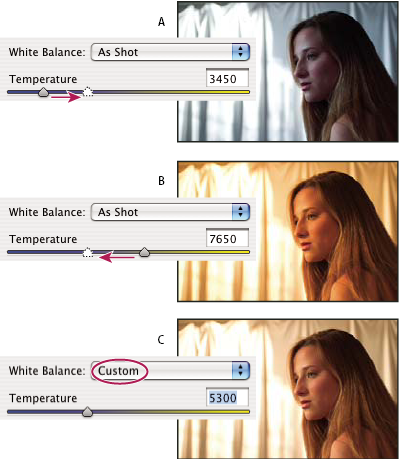 Correcting the white balance
- A.
- Moving the Temperature slider to the right corrects a photo taken with a higher color temperature of light
- B.
- Moving the Temperature slider to the left corrects a photo taken with a lower color temperature of light
- C.
- Photo after color temperature adjustment
- Tint
-
Sets the white balance to compensate for a green or magenta
tint. Decrease Tint to add green to the image; increase Tint to
add magenta.
 To adjust the white balance quickly,
select the White Balance tool
To adjust the white balance quickly,
select the White Balance tool  , and
then click an area in the preview image that should be a neutral
gray or white. The Temperature and Tint properties adjust to make
the selected color exactly neutral (if possible). If you’re clicking
whites, choose a highlight area that contains significant white
detail rather than a specular highlight. You can double-click the
White Balance button to reset White Balance to As Shot.
, and
then click an area in the preview image that should be a neutral
gray or white. The Temperature and Tint properties adjust to make
the selected color exactly neutral (if possible). If you’re clicking
whites, choose a highlight area that contains significant white
detail rather than a specular highlight. You can double-click the
White Balance button to reset White Balance to As Shot.