

Zoom in or out
 Do any of the following:
-
Select the Zoom tool
 , and
click either the Zoom In
, and
click either the Zoom In  or
Zoom Out button
or
Zoom Out button  in
the options bar. Click the area you want to magnify.
in
the options bar. Click the area you want to magnify. -
Select the Zoom tool. The pointer becomes a magnifying glass with a plus sign in its center. Click the center of the area that you want to magnify, or hold down Alt (Windows) or Option (Mac OS) and click the center of the area that you want to reduce. Each click magnifies or reduces the view to the previous preset percentage.
Note: When you use the Zoom or Zoom Out tool, each click magnifies or reduces the image to the next preset percentage and centers the display around the point you click. When the image has reached its maximum magnification level of 1600% or minimum size of 1 pixel, the magnifying glass appears empty. -
Select the Zoom tool and drag a dotted rectangle, called a marquee, around the area you want to magnify. To move the marquee around the artwork, hold down the spacebar and continue dragging until the marquee is in the desired location.
-
Choose View > Zoom In or View > Zoom Out. When the image reaches its maximum or minimum magnification, the command is dimmed.
-
Set the zoom level at the lower left corner of the document window or in the Navigator palette.
-
To display a file at 100%, choose View > Actual Pixels.
-
To change the view to fit the document window, choose View > Fit on Screen.
 If your mouse has a scroll wheel, you
can use it to zoom in or out after selecting the Zoom tool. Choose
Edit > Preferences > General (Windows) or
Photoshop > Preferences > General (Mac OS)
and select the Zoom With Scroll Wheel option to enable this behavior.
If your mouse has a scroll wheel, you
can use it to zoom in or out after selecting the Zoom tool. Choose
Edit > Preferences > General (Windows) or
Photoshop > Preferences > General (Mac OS)
and select the Zoom With Scroll Wheel option to enable this behavior. Zoom into or out of multiple images
- Open one or more images, or copies of a single image.
- Choose Window > Arrange > Tile Horizontally/Tile Vertically to display the images edge to edge.
- Select the Zoom tool, and then do one of the following:
-
Select Zoom All Windows in the options bar, and then click one of the images. The other images zoom in or out at the same time.
-
Choose Window > Arrange > Match Zoom. Hold down the Shift key and click one of the images. The other images zoom in or out at the same magnification.
-
Magnify by dragging
- Drag over the part of the image that you want to magnify.
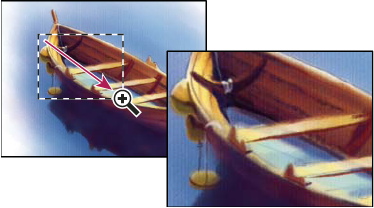 Dragging the Zoom tool to magnify the view of an image
The area inside the zoom marquee is displayed at the highest possible magnification. To move the marquee around the artwork in Photoshop, begin dragging a marquee and then hold down the spacebar while dragging.
Automatically resize the window when zooming
With the Zoom tool active, select
Resize Windows To Fit in the options bar. The window is resized
when you magnify or reduce the view of the image.
When Resize Windows To Fit is deselected (the default), the window maintains a constant size regardless of the image magnification. This can be helpful when using smaller monitors or working with tiled views.
Display an image at 100%
Do one of the following:-
Double-click the Zoom tool in the toolbox.
-
Choose View > Actual Pixels.
-
Enter 100% in the Status Bar and press Enter (Windows) or Return (Mac OS).