Photoshop

Print images

Photoshop provides the following printing commands:

Page Setup
Displays options specific to your printer, printer drivers, and operating system.

Print
Displays the Print dialog box, where you can preview the print job and select the printer, number of copies, output options, and color management options.

Print One Copy
Prints one copy of a file without displaying a dialog box.

Set Photoshop print options and print

  1. Choose File > Print.
    View full size graphic
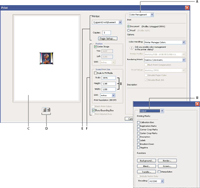
    Print dialog box

    A.
    Specify color management and proofing options

    B.
    Specify prepress output options

    C.
    Preview print

    D.
    Set paper orientation

    E.
    Set printer and print job options

    F.
    Position and scale image

    For a video on printing photos, see www.adobe.com/go/vid0015.

  2. Do one or more of the following:
    • Use the Printers menu to select a printer.

    • Set the paper orientation to portrait or landscape.

    • Select the number of copies to print.

    • Adjust the position and scale of the image in relation to the selected paper size and orientation. See Position and scale images.

    • Set Output and Color Management options from the pop‑up menu.

  3. Do one of the following:
    • To print the image, click Print.

    • To close the dialog box without saving the options, click Cancel.

    • To preserve the options and close the dialog box, click Done.

    • To print one copy of the image, hold down Alt (Windows) or Option (Mac OS), and click Print One.

    • To reset the print options, hold down Alt (Windows) or Option (Mac OS), and click Reset.

    • To save the print options without closing the dialog box, hold down Alt (Windows) or Option (Mac OS), and click Remember.
      Note: If you get a warning that your image is larger than the printable area of the paper, click Cancel, choose File > Print, and select the Scale To Fit Media box. To make changes to your paper size and layout, click Page Setup, and attempt to print the file again.

Preview the current image position and paper orientation

 Position the pointer over the file information area in the status bar (at the bottom of the application window in Windows or the document window in Mac OS) and hold down the mouse button.

Set page setup options

  1. Choose File > Page Setup, or click Page Setup in the Print dialog box.
  2. Set paper size, source, orientation, and margins as desired.

    The available options depend on your printer, printer drivers, and operating system.

    Note: If you plan to scale the printed image, choose Print and use the scaling options in the Print dialog box rather than the Page Setup dialog box. The Print dialog box is more helpful because it shows you a preview of the scaled image. Also, you don’t want to set the scaling options in both the Page Setup and Print dialog boxes. This applies scaling twice, and the resulting image may not be printed at the intended size.
  3. (Optional) Click Printer to change your currently selected printer.