

Transparency effects
InDesign offers nine transparency effects. Many of the settings and options for creating these effects are similar.
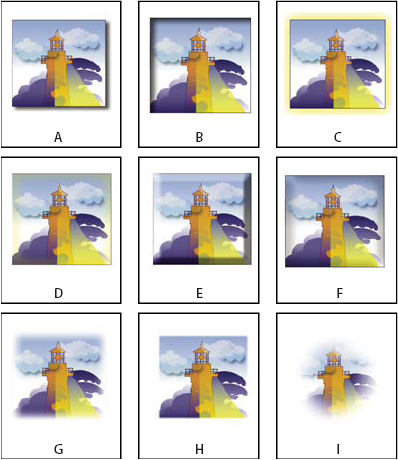
- A.
- Drop Shadow
- B.
- Inner Shadow
- C.
- Outer Glow
- D.
- Inner Glow
- E.
- Bevel and Emboss
- F.
- Satin
- G.
- Basic Feather
- H.
- Directional Feather
- I.
- Gradient Feather
- Drop Shadow
- Adds a shadow that falls behind the object, stroke, fill, or text.
- Inner Shadow
- Adds a shadow that falls just inside the edges of the object, stroke, fill, or text, giving it a recessed appearance.
- Outer Glow and Inner Glow
- Add glows that emanate from the outside or inside edges of the object, stroke, fill, or text.
- Bevel and Emboss
- Adds various combinations of highlights and shadows to give text and images a three-dimensional appearance.
- Satin
- Adds interior shading that makes a satiny finish.
- Basic Feather, Directional Feather, and Gradient Feather
-
Soften the edges of an object by fading them to transparent.
Note: In addition to the descriptions covered here, see Common transparency settings and options.
 Drop Shadow
The Drop Shadow effect creates a three-dimensional shadow. You can offset the drop shadow along the x or y axis, as well as vary the blending mode, color, opacity, distance, angle, and size of the drop shadow. Use these options to determine how the drop shadow interacts with objects and transparency effects:
- Object Knocks Out Shadow
- The object appears in front of the drop shadow that it casts.
- Shadow Honors Other Effects
- The drop shadow factors in other transparency effects. For example, if the object is feathered on one side, you can make the drop-shadow disregard the feathering such that the shadow doesn’t fade out, or make the shadow look feathered in the same way as the object is feathered.
Click the Drop Shadow button  on
the Control panel to quickly apply a drop shadow to or remove a
drop shadow from an object, a stroke, a fill, or text.
on
the Control panel to quickly apply a drop shadow to or remove a
drop shadow from an object, a stroke, a fill, or text.
 To select a color for a drop shadow, click the
Set Shadow Color button (next to the Blending Mode menu) and choose
a color.
To select a color for a drop shadow, click the
Set Shadow Color button (next to the Blending Mode menu) and choose
a color.For a video on creating drop shadows, see www.adobe.com/go/vid0085.
Inner Shadow
The Inner Shadow effect places the shadow inside the object, giving the impression that the object is recessed. You can offset the inner shadow along different axes and vary the blending mode, opacity, distance, angle, size, noise, and choke of the shadow.
Outer Glow
The Outer Glow effect makes the glow emanate from under the object. You can set the blending mode, opacity, technique, noise, size, and spread.
Inner Glow
The Inner Glow effect causes an object to glow from the inside out. Choose the blending mode, opacity, technique, size, noise and choke settings, as well as the Source setting:
- Source
- Specifies the source for the glow. Choose Center to apply a glow that emanates from the center; choose Edge to apply a glow that emanates from the object’s boundaries.
Bevel and Emboss
Use the Bevel and Emboss effect to give objects a realistic, three-dimensional look. The Structure settings determine the object’s size and shape:
- Style
- Specifies the bevel style: Outer Bevel creates the bevel on the outside edges of the object; Inner Bevel creates the bevel on the inside edges; Emboss simulates the effect of embossing the object against underlying objects; Pillow Emboss simulates the effect of stamping the edges of the object into underlying objects.
- Size
- Determines the size of the bevel or emboss effect.
- Technique
- Determines how the edge of the bevel or emboss effect interacts with background colors: Smooth blurs the edges slightly (and doesn’t preserve detailed features at larger sizes); Chisel Soft blurs the edges, but not as much as the Smooth technique (it preserves detailed features better than the Smooth technique but not as well as the Chisel Hard technique); Chisel Hard provides a harder, more conspicuous edge (it preserves detailed features better than the Smooth or Chisel Soft techniques).
- Soften
- In addition to the Technique setting, blurs the effect to reduce unwanted artifacts and rough edges.
- Direction
- Choose Up or Down to make the effect appear pushed up or down.
- Depth
- Specifies the depth of the bevel or emboss effect.
The Shading settings determine how light interacts with the object:
- Angle and Altitude
- Sets the height of the light source. A setting of 0 is equivalent to ground level; 90 is directly above the object.
- Use Global Light
- Applies the global light source as specified for all transparency effects. Choosing this option overrides any Angle and Altitude settings.
- Highlight and Shadow
- Specifies the blending mode for the bevel or emboss highlight and shadow.
Satin
Use the Satin effect to give objects a smooth, satin-like finish. Choose the blending mode, opacity, angle, distance, and size settings, as well as whether to invert colors and transparencies:
- Invert
- Select this option to reverse the colored and transparent areas of the object.
Basic Feather
- Feather Width
- Sets the distance over which the object fades from opaque to transparent.
- Choke
- Along with the Feather Width setting, determines how much of the softening glow is opaque and how much is transparent; a large setting increases opacity and a small setting increases transparency.
- Corners
-
Choose Sharp, Rounded, or Diffused:
- Sharp
- Follows the outer edge of the shape, including sharp corners. This option is appropriate for star-like objects and a special effect on a rectangular shape.
- Rounded
- Rounds the corner by the feather radius; essentially, the shape is first inset, then outset, to form the two contours. This option works well with rectangles.
- Diffused
- Uses the Adobe Illustrator method, which makes the edges of the object fade from opaque to transparent.
For a video on feathering, see www.adobe.com/go/vid0086.
- Noise
- Specifies the amount of random elements in the softening glow. Use this option to soften the glow.
Directional Feather
- Feather Widths
- Set the distance over which the top, bottom, left side, and right side of the object fade to transparent. Select the Lock option to fade each side of the object by the same distance.
- Noise
- Specifies the amount of random elements in the softening glow. Use this option to create a softer glow.
- Choke
- Along with the Width settings, determines how much of the glow is opaque and how much is transparent; large settings increase opacity and small settings increase transparency.
- Shape
- Choose an option—First Edge Only, Leading Edges, or All Edges—to demarcate the object’s original shape.
- Angle
- Rotates the frame of reference for the feathering effect such that, as long as you don’t enter a multiple of 90 degrees, the feathering edges are skewed rather than parallel to the object.
Gradient Feather
- Gradient Stops
-
Create one gradient stop for each gradation in transparency that
you want for your object.
-
To create a gradient stop, click below the Gradient Slider (drag a gradient stop away from the slider to remove a stop).
-
To adjust the position of a stop, drag it left or right, or select it and then drag the Location slider.
-
To adjust the mid-point between two opacity stops, drag a diamond above the Gradient Slider. Where the diamond is located determines how abrupt or gradual the transition between stops is.
-
- Reverse Gradient
- Click to reverse the direction of the gradations. This box is located to the right of the Gradient Slider.
- Opacity
- Specifies the transparency between gradient points. Select a point and drag the Opacity slider.
- Location
- Adjusts the position of a gradient stop. Select a gradient stop before dragging the slider or entering a measurement.
- Type
- Linear shades from the starting gradient point to the ending gradient point in a straight line; Radial shades from the starting point to the ending point in a circular pattern.
- Angle
- For linear gradients, establishes the angle of the gradation lines. At 90 degrees, for example, the lines run horizontally; at 180 degrees, the lines run vertically.