

Import options for graphics
The options for importing graphics vary depending on the type of image being imported.
 Encapsulated PostScript (.eps) import options
When you place an EPS graphic (or a file saved with Illustrator 8.0 or earlier) and select Show Import Options in the Place dialog box, you’ll see a dialog box containing these options:
- Read Embedded OPI Image Links
-
This option tells InDesign to read links
from OPI comments for images included (or nested) in the graphic.
Deselect this option if you’re using a proxy-based workflow and plan to have your service providers perform the image replacement using their OPI software. When this option is deselected, InDesign preserves the OPI links but does not read them. When you print or export, the proxy and the links are passed on to the output file.
Select this option if you’re using a proxy-based workflow and you want InDesign, instead of your service provider, to perform image replacement when you output the final file. When you select this option, the OPI links appear in the Links panel.
Also select this option when you import EPS files containing OPI comments that are not part of a proxy-based workflow. For example, if you import an EPS file containing OPI comments for an omitted TIFF or bitmap image, you’ll want to select this option so that InDesign can access the TIFF information when you output the file.
- Apply Photoshop Clipping Path
- Select this option to apply a clipping path from a Photoshop EPS file. Not all the paths you created in Photoshop appear when placing EPS files. Only one clipping path displays, so make sure you convert the desired path to a clipping path in Photoshop before saving as EPS. (To preserve editable clipping paths, save the file as a PSD instead.)
- Proxy Generation
-
This creates a low-resolution bitmap representation of an image
when drawing the file to the screen. The following settings control
how the proxy will be generated:
- Use TIFF or PICT Preview
- Some EPS images contain an embedded preview. Select Use TIFF or PICT Preview to generate the proxy image of the existing preview. If a preview does not exist, the proxy will be generated by rasterizing the EPS to an offscreen bitmap.
- Rasterize the PostScript
-
Select this option to ignore the embedded preview. This option
is typically slower but provides the highest-quality results.
Note: When your import more than one single file into the same document, all instances share the proxy setting of the first instance of the imported file.
Bitmap import options
You can apply color-management options to individual imported graphics when using color-management tools with a document. You can also import a clipping path or an alpha channel saved with an image created in Photoshop. Doing so lets you directly select an image and modify its path without changing the graphic frame.
When you place a PSD, TIFF, GIF, JPEG, or BMP file and select Show Import Options in the Place dialog box, you’ll see a dialog box containing these options:
- Apply Photoshop Clipping Path
- If this option isn’t available, the image wasn’t saved with a clipping path, or the file format doesn’t support clipping paths. If the bitmap image doesn’t have a clipping path, you can create one in InDesign.
- Alpha channel
-
Select an alpha channel to import the area of the image saved
as an alpha channel in Photoshop. InDesign uses the alpha channel
to create a transparent mask on the image. This option is available
only for images that contain at least one alpha channel.
 Image imported without clipping path (left) and with clipping path (right)
Click the Color tab to view the following options:
- Profile
- If Use Document Default is selected, leave this option unchanged. Otherwise, choose a color source profile that matches the gamut of the device or software used to create the graphic. This profile enables InDesign to properly translate its color to the gamut of the output device.
- Rendering Intent
- Choose a method for scaling the color range of the graphic to the color range of the output device. Typically, you’ll choose Perceptual (Images) because it accurately represents colors in photographs. The Saturation (Graphics), Relative Colorimetric, and Absolute Colorimetric options are better for areas of solid color; they don’t reproduce photographs well. Rendering Intent options aren’t available for bitmap, grayscale, and index-color mode images.
Portable Network Graphics (.png) import options
When you place a PNG image and select Show Import Options in the Place dialog box, you’ll see a dialog box with three sections of import settings. Two sections contain the same options available for other bitmap image formats. The other section, PNG Settings, contains the following settings:
- Use Transparency Information
- This option is enabled by default when a PNG graphic includes transparency. If an imported PNG file contains transparency, the graphic interacts only where the background is transparent.
- White Background
- If a PNG graphic does not contain a file-defined background color, this option will be selected by default. However, it is only enabled if Use Transparency Information is activated. If this option is selected, white is used as the background color when applying transparency information.
- File Defined Background Color
- If a PNG graphic was saved with a non-white background color, and Use Transparency Information is selected, this option is selected by default. If you don’t want to use the default background color, click White Background to import the graphic with a white background, or deselect Use Transparency Information to import the graphic without any transparency (displaying areas of the graphic that are currently transparent). Some image-editing programs can’t specify a non-white background color for PNG graphics.
- Apply Gamma Correction
- Select this option to adjust the gamma (midtone) values of a PNG graphic as you place it. This option lets you match image gamma to the gamma of the device you will use to print or display the graphic (such as a low-resolution or non‑PostScript printer or computer monitor). Deselect this option to place the image without applying any gamma correction. By default, this option is selected if the PNG graphic was saved with a gamma value.
- Gamma Value
-
This option, available only if Apply Gamma Correction is selected,
displays the gamma value that was saved with the graphic. To change the
value, type a positive number from 0.01 to 3.0.
When PNG files are imported, the settings in the Image Import Options dialog box are always based on the selected file, not on the default or last-used settings.
Acrobat (.pdf) import options
InDesign preserves the layout, graphics, and typography in a placed PDF. As with other placed graphics, you cannot edit a placed PDF page within InDesign. You can control the visibility of layers in a layered PDF. You can also place more than one page of a multipage PDF.
When you place a PDF that was saved with passwords, you’ll be prompted to enter the required passwords. If the PDF file was saved with usage restrictions (for example, no editing or printing), but no passwords, you can place the file.
When you place a PDF (or a file saved with Illustrator 9.0 or later) and select Show Import Options in the Place dialog box, you’ll see a dialog box containing the following options:
- Show preview
- Preview a page in the PDF before you place it. If you’re placing a page from a PDF that contains multiple pages, click the arrows, or type a page number under the preview image to preview a specific page.
- Pages
- Specify the pages you want to place: the page displayed in the preview, all pages, or a range of pages.
- Crop to
-
Specify how much of the PDF page to place:
- Bounding box
- Places the PDF page’s bounding box, or the minimum area that encloses the objects on the page, including page marks.
- Art
- Places the PDF only in the area defined by a rectangle that the author created as a placeable artwork (for example, clip art).
- Crop
- Places the PDF only in the area that is displayed or printed by Adobe Acrobat.
- Trim
- Identifies the place where the final produced page will be physically cut in the production process, if trim marks are present.
- Bleed
- Places only the area that represents where all page content should be clipped, if a bleed area is present. This information is useful if the page is being output in a production environment. Note that the printed page may include page marks that fall outside the bleed area.
- Media
-
Places the area that represents the physical paper size of
the original PDF document (for example, the dimensions of an A4
sheet of paper), including page marks.
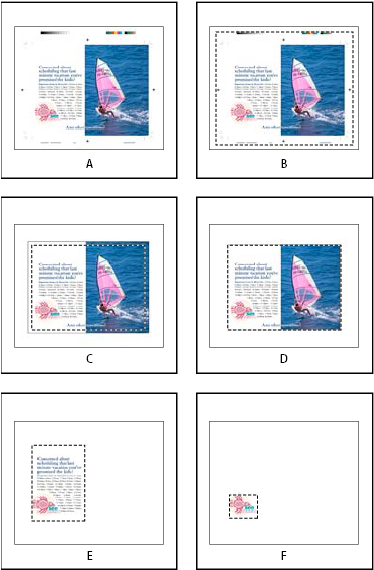 Options for cropping placed PDFs
- A.
- Media
- B.
- Content
- C.
- Bleed
- D.
- Trim
- E.
- Crop
- F.
- Art
- Transparent Background
-
Select this option to reveal text or graphics that fall beneath
the PDF page in the InDesign layout. Deselect this option to place
the PDF page with an opaque white background.
 If
you make the background transparent in a frame containing a PDF
graphic, you can make it opaque later by adding a fill to the frame.
If
you make the background transparent in a frame containing a PDF
graphic, you can make it opaque later by adding a fill to the frame.
InDesign (.indd) import options
InDesign preserves the layout, graphics, and typography in a placed INDD file. However, the file is treated as an object, and you can’t edit it, although you can control the visibility of layers and choose which pages of a multi-page INDD file to import.
When you place an InDesign file and select Show Import Options in the Place dialog box, you’ll see a dialog box containing the following options:
- Show preview
- Preview a page before you place it. You can type a page number or click the arrows to preview a page in a multi-page document.
- Pages
- Specify the pages you want to place: the page displayed in the preview, all pages, or a range of pages.
- Crop to
- Specify how much of the page or pages to place, the page itself or the bleed or slug areas on the pasteboard.