InDesign

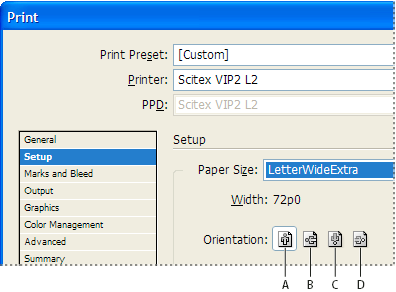
Specify paper size and page orientation

It’s important to distinguish between page size (as defined in the Document Setup dialog box for your document) and paper size (the sheet of paper, piece of film, or area of the printing plate you’ll print on). Your page size might be US Letter (8.5-by-11 inches), but you might need to print on a larger piece of paper or film to accommodate any printer’s marks or the bleed and slug areas.

The list of paper sizes available to InDesign comes from the PPD (PostScript printers) or from the printer driver (non-PostScript printers). If the printer and PPD you’ve chosen for PostScript printing support custom paper sizes, you’ll see a Custom option in the Paper Size menu.

Most imagesetters can accommodate regular paper sizes, such as letter and tabloid, as well as transverse orientation, where the regular page size is rotated 90° when printed. The transverse orientation is often a more efficient use of imagesetter media.
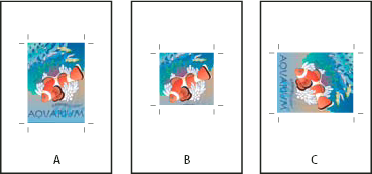
Page size and orientations for imagesetters

A.
Letter (tall orientation)

B.
Custom page size (tall orientation)

C.
Letter (transverse orientation)

Paper sizes are listed by familiar names (such as Letter). The dimensions define the limits of the imageable area—the total paper size, less any unprintable border used by the printer or imagesetter. Most laser printers cannot print to the exact edge of a page.

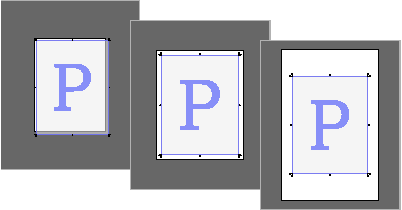
If you select a different paper size (for example, if you change from Letter to Legal), the document is rescaled in the preview window. The preview window displays the entire imageable area of the selected page; when the preview size is changed, the preview window automatically rescales to include the imageable area.

Note: The imageable area will vary by PPD file, even for the same paper size (for example, Letter), because different printers and imagesetters define the sizes of their imageable areas differently.
Comparison of printing a letter-size page on Letter, Letter.extra, or Tabloid paper

Note: The preview in the lower left area of the Print dialog box indicates whether you have enough space to include all printer’s marks and the bleed and slug areas.

Specify paper size and orientation

  1. Choose File > Print.
  2. In the Setup area of the Print dialog box, choose an option in the Paper Size menu.

    Make sure that your paper size is large enough to contain your document, the bleed and slug areas (if included), and any printer’s marks. To conserve imagesetter film or paper, however, select the smallest paper size that will accommodate your document and the necessary printing information.

  3. Click an Orientation button to rotate the document on the media.

    In most cases, the page orientation specified in Document Setup (File > Document Setup) and the output orientation specified in the Setup area of the Print dialog box should be the same (both portrait or both landscape), whether you print normal or transverse. If you’re printing spreads, you may want to choose a different paper size and orientation (such as landscape) to fit all pages of a spread on a single sheet.

Orientation buttons

A.
Portrait

B.
Landscape

C.
Reverse Portrait

D.
Reverse Landscape

Specify a custom paper size

If you’re using a printer that accommodates various paper sizes, such as a high-resolution imagesetter, you can specify a custom paper size when you print. InDesign makes the custom option available only if the selected PPD supports custom paper sizes.

The largest custom paper size you can specify depends on the maximum imageable area of your imagesetter. For more information, consult the documentation for your specific printer.

Note: Custom paper size options for non-PostScript printers is not accessible from the InDesign Print dialog box. To set those printer-specific features, click Setup (Windows), Printer (Mac OS), or Page Setup (Mac OS) in the InDesign Print dialog box. Check the documentation for your non-PostScript printer driver for details.
  1. Choose File > Print.
  2. If you are printing a PostScript file, choose PostScript for Printer in the General area of the Print dialog box. Then select the PPD that supports custom paper sizes.
  3. In the Setup area of the Print dialog box, choose Custom in the Paper Size menu.
    Note: If Custom is not available, the PPD you selected when you set up your printer does not support custom paper sizes.
  4. To specify width and height, do one of the following:
    • To let InDesign determine the smallest paper size needed for your document’s contents, bleed and/or slug areas, and any printer’s marks, select Auto for Width and Height. Auto, the default option, is also useful if you have different sized pages in a book and you’re printing on continuous media, such as a roll of film or photosensitive paper.

    • To specify a paper size larger than the default, enter new dimensions in the Width and Height text boxes. Be sure to increase the values; decreasing the default values may clip your document.

  5. To change the placement of the page on the film, enter a value for Offset.

    The Offset value specifies the amount of space along the left side of the imageable area. For example, entering a value of 30 points in the Offset option shifts your page 30 points to the right.

  6. To rotate both media and page contents, select Transverse and click OK.

    You can conserve a considerable amount of film or paper by using Transverse in conjunction with Offset. Compare the following examples of an image printed by InDesign with Transverse selected and deselected.

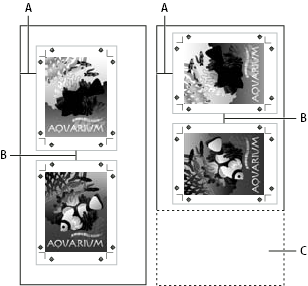
    Transverse deselected (left) compared to Transverse selected (right)

    A.
    Offset value

    B.
    Gap

    C.
    Film saved

  7. To specify the distance between individual pages when printing on continuous media, enter a value for Gap.