

Adjust color and tonality with Curves
You can adjust the tonality and color of an image by changing the shape of the curve in the Curves dialog box. Moving the curve upward or downward lightens or darkens the image, depending on whether the dialog box is set to display levels or percentages. The steeper sections of the curve represent areas of higher contrast; flatter sections represent areas of lower contrast.
If the Curves dialog box is set to display levels rather than percentages, the highlights are represented in the top right corner of the graph. Moving a point in the top portion of the curve adjusts the highlights; moving a point in the center of the curve adjusts the midtones; and moving a point in the bottom section of the curve adjusts the shadows. To darken highlights, move a point down near the top of the curve. Moving a point either down or to the right maps the Input value to a lower Output value, and the image darkens. To lighten the shadows, move a point up near the bottom of the curve. Moving a point either up or to the left maps a lower Input value to a higher Output value, and the image lightens.
-
Add
a point along the curve by doing one of the following:
-
Click directly on the curve.
-
(RGB images only) Ctrl-click (Windows) or Command-click (Mac OS) a pixel in the image.
Ctrl/Command-clicking pixels in the image is the best way to add points when you want to preserve or adjust specific details in an RGB image.
 To identify areas in the
image that are being clipped (completely black or completely white),
select Show Clipping.
To identify areas in the
image that are being clipped (completely black or completely white),
select Show Clipping. You can add up to 14 control points to the curve. To remove a control point, drag it off the graph, select it and press Delete; or Ctrl-click (Windows) or Command-click (Mac OS) the control point. You cannot delete the endpoints of the curve.
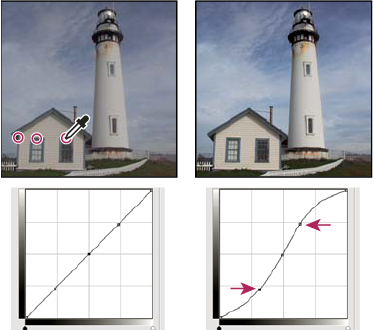 Ctrl-click (Windows) or Command-click (Mac OS) three areas of an image to add points to the curve. Lightening the highlights and darkening the shadows is represented by an S‑curve where the image contrast is increased.
To
determine the lightest and darkest areas in an RGB image, drag across
the image. The Curves dialog box displays the intensity values of
the area under the pointer, and the corresponding location on the
curve. Dragging the pointer across a CMYK image shows the percentages
in the Color palette, if it’s set to display CMYK values. -
 Apply an Auto correction
You can apply an automatic color correction using options in the Auto Color Correction Options dialog box. You can apply an Auto Color, Auto Contrast, or Auto Levels correction to an image. For more information on these options, see Set Auto adjustment options.
Set black and white points
Use the Black and White sliders to quickly set black and white points. For example, if you move the black point slider to the right at input 5, Photoshop maps all the pixels at input 5 and lower to level 0. Similarly, if you move the white point slider to the left at level 243, Photoshop maps all pixels at level 243 and higher to level 255. The mapping affects the darkest and lightest pixels in each channel. The corresponding pixels in the other channels are adjusted proportionately to avoid altering the color balance.
 Drag the black and white point sliders to any
point along the axis. As you drag, note that the input value changes.
To preview clipping as you adjust black and white points, select
Show Clipping in the Curves dialog box, or hold down Alt (Windows)
or Option (Mac OS) as you drag the sliders.
Drag the black and white point sliders to any
point along the axis. As you drag, note that the input value changes.
To preview clipping as you adjust black and white points, select
Show Clipping in the Curves dialog box, or hold down Alt (Windows)
or Option (Mac OS) as you drag the sliders. Keyboard shortcuts: Curves dialog box
You can use these keyboard shortcuts in the Curves dialog box:
-
To set a point on the curve in the current channel specified in the Curves dialog box, Ctrl-click (Windows) or Command-click (Mac OS) in the image.
-
To set a point on the curve for the selected color in each color component channel (but not in the composite channel), Shift+Ctrl-click (Windows) or Shift+Command-click (Mac OS) in the image.
-
To select multiple points, Shift-click points on the curve. Selected points are filled with black.
-
To deselect all points on the curve, click in the grid, or press Ctrl‑D (Windows) or Command‑D (Mac OS).
-
To move selected points on the curve, press the arrow keys.
-
To move forward through control points on the curve, press the right arrow key.
-
To move backward through control points on the curve, press the left arrow key.